Add MP3 Files to Blogger - Part 1
NEWS NOTE: September 1st - MP3 player fix! A few months ago Google removed their shared media player! There were many Bloggers and Webmasters on the Google forums complaining. For whatever reason - the Google player is now back and working. However, I have found other solutions to the free MP3 player issue - in Part 3 if you want a different option!
One nagging theme that consistently bothers Blogger users is the lack of storage available for file types other than images and videos when attempting to expand your blog. I don't know how many times I've seen users asking for upload storage for PowerPoint slides, PDF files, databases, etc. Probably the single most popular request is "how can I upload a MP3 file to Blogger and embed it in a flash player?" without some odd widget or custom call-out.
The reason why the MP3 request is called out so often is mainly due to the desire to have either music or podcasts directly embedded in your posts.
What many Blogger users don't realize is that by registering as a Google user, you have many of their tools at your disposal--including the not so obvious ability to utilize free Google storage (which translates directly to the ability to upload MP3 files).
Now, uploading a MP3 file to Blogger is not a direct upload through the Blogger interface but is very easy with just a few steps to get you there quickly. So, let's get started!!
So, just what is a Google Site? Sites is a free website building tool that Google picked up as an acquisition some years back. It is not overly popular but does have some interesting capabilities. You can use it as a standalone tools to build full, mostly static websites without any hosting fees. In our case we're only using it as a background placeholder.
The first thing you're going to want to look for is the Google Sites menu item. It is a bit hidden under the More menu selection as shown here:
Simply go ahead and choose 'Sites' to get started. You're really not going to use the site builder to build a full website at this point (though you could if wanted), just utilizing some of the storage functionality that Google provides with this tool.
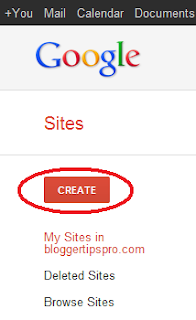
Select the menu button 'CREATE' to make a background site for your Blogger blog:
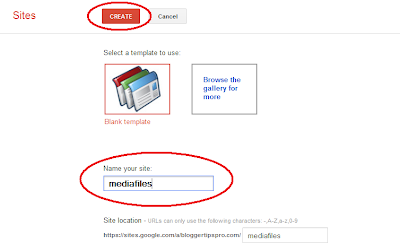
This will lead you to the next page that will allow you to name your site and associated themes if you want. The key at this point is to just use the default 'Blank Template' that is preselected. I like to use the name 'media' or 'mediafiles' if my goal is to have Blogger use MP3 music or podcasts:
Go ahead and press 'CREATE' to have Sites kick off the website build. In a second or two you should see something like this which is the left pane of the newly created website:
You now have the website shell ready to land your MP3 files. But, the default pages are only static ones at this point without any ability to upload or store files. For the last phase of this Part 1 you need to create a certain type of webpage called a 'File Cabinet'.
The next step is adding a web page to your site. Go up to the far right menu item in Sites and select the 'New page (c)' icon button:
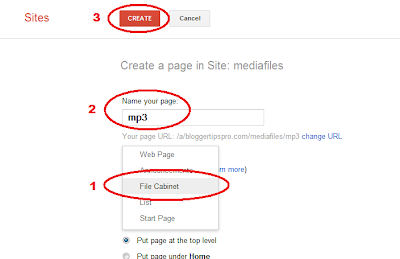
You'll be prompted with a page setup dialog that will need to 'Name your page:' and set the page type like so - be sure to use the numbered order to setup the page correctly. I prefer to create a File Cabinet page called mp3 to set the file types. You can call it whatever makes sense to you:
Go ahead and press 'CREATE' to build the new webpage. Your site should return looking something like this:
You've now created the needed shell to get your MP3 files to some free storage from Blogger. Before you start working with this site, however, you need to follow one last step - setting the visibility of the webpages to be Public.
In this upper right menu choose the 'More' dropdown button to select the 'Sharing and Permissions' option:
Once you've selected it, you'll be in the Manage Site section. You'll want to select the visibility permission to allow these pages to be fully 'Public on the web' like so:
Done!! You're now ready to start using Google Sites for your Blogger MP3 files! Since this is only Part 1 please note this is not the final step of the process. You're going to need to do a couple of tricks in Blogger to start using this site. Don't worry -- it is an easy process. Take some time to learn Google Sites (Mary Fran's Getting Started with Google Sites is a good tutorial) some more so you're comfortable with navigating through it.
Next up - Creating and Uploading your MP3 files to Google Sites for use on Blogger
One nagging theme that consistently bothers Blogger users is the lack of storage available for file types other than images and videos when attempting to expand your blog. I don't know how many times I've seen users asking for upload storage for PowerPoint slides, PDF files, databases, etc. Probably the single most popular request is "how can I upload a MP3 file to Blogger and embed it in a flash player?" without some odd widget or custom call-out.
The reason why the MP3 request is called out so often is mainly due to the desire to have either music or podcasts directly embedded in your posts.
What many Blogger users don't realize is that by registering as a Google user, you have many of their tools at your disposal--including the not so obvious ability to utilize free Google storage (which translates directly to the ability to upload MP3 files).
Now, uploading a MP3 file to Blogger is not a direct upload through the Blogger interface but is very easy with just a few steps to get you there quickly. So, let's get started!!
Creating a Google Site for MP3 Storage
So, just what is a Google Site? Sites is a free website building tool that Google picked up as an acquisition some years back. It is not overly popular but does have some interesting capabilities. You can use it as a standalone tools to build full, mostly static websites without any hosting fees. In our case we're only using it as a background placeholder.
The first thing you're going to want to look for is the Google Sites menu item. It is a bit hidden under the More menu selection as shown here:
Simply go ahead and choose 'Sites' to get started. You're really not going to use the site builder to build a full website at this point (though you could if wanted), just utilizing some of the storage functionality that Google provides with this tool.
Select the menu button 'CREATE' to make a background site for your Blogger blog:
This will lead you to the next page that will allow you to name your site and associated themes if you want. The key at this point is to just use the default 'Blank Template' that is preselected. I like to use the name 'media' or 'mediafiles' if my goal is to have Blogger use MP3 music or podcasts:
Go ahead and press 'CREATE' to have Sites kick off the website build. In a second or two you should see something like this which is the left pane of the newly created website:
You now have the website shell ready to land your MP3 files. But, the default pages are only static ones at this point without any ability to upload or store files. For the last phase of this Part 1 you need to create a certain type of webpage called a 'File Cabinet'.
Creating the Blogger MP3 File Cabinet
The next step is adding a web page to your site. Go up to the far right menu item in Sites and select the 'New page (c)' icon button:
You'll be prompted with a page setup dialog that will need to 'Name your page:' and set the page type like so - be sure to use the numbered order to setup the page correctly. I prefer to create a File Cabinet page called mp3 to set the file types. You can call it whatever makes sense to you:
Go ahead and press 'CREATE' to build the new webpage. Your site should return looking something like this:
You've now created the needed shell to get your MP3 files to some free storage from Blogger. Before you start working with this site, however, you need to follow one last step - setting the visibility of the webpages to be Public.
In this upper right menu choose the 'More' dropdown button to select the 'Sharing and Permissions' option:
Once you've selected it, you'll be in the Manage Site section. You'll want to select the visibility permission to allow these pages to be fully 'Public on the web' like so:
Done!! You're now ready to start using Google Sites for your Blogger MP3 files! Since this is only Part 1 please note this is not the final step of the process. You're going to need to do a couple of tricks in Blogger to start using this site. Don't worry -- it is an easy process. Take some time to learn Google Sites (Mary Fran's Getting Started with Google Sites is a good tutorial) some more so you're comfortable with navigating through it.
Next up - Creating and Uploading your MP3 files to Google Sites for use on Blogger


All In One: How To Post Any Kind Of File To Blogger >>>>> Download Now
ReplyDelete>>>>> Download Full
All In One: How To Post Any Kind Of File To Blogger >>>>> Download LINK
>>>>> Download Now
All In One: How To Post Any Kind Of File To Blogger >>>>> Download Full
>>>>> Download LINK Tk